Image Science
How To Prepare Files For Printing
Setting Up Print Files
File Specifications
COLOUR
- RGB files only - NO CMYK!
- Colour Space must be AdobeRGB, sRGB, ProPhotoRGB, or P3.
- Must be correctly tagged or embedded with an ICC Profile / Colour Space (eg. AdobeRGB, sRGB, ProPhotoRGB, P3 etc.)
- For B&W do NOT convert into a Dot Gain or Grey Gamma profile. Please leave in a working RGB space instead.
- Photoshop: Make sure you tick 'embed ICC profile' when you save your file.
- Soft Proofing: Contact Us and we can provide ICC profiles for soft proofing purposes for your paper of choice.
- 'Untagged' files will be treated as sRGB.
SIZE & LAYOUT
- No borderless/full bleed - we have maximum safe printable areas, see below for more info if you're wanting to do borderless.
- We have maximum safe printable areas! Your image must be within these! Please use our templates or see our maximum safe dimensions for each size below.
- If you want a trim, you must supply full trim lines (NOT trim marks or a stroked box) and pop a note in requesting a trim. See below, and our guide.
- The size tags of your file must be correctly set.
- When sizing your image it is best to place it on a canvas the physical size of the print you have requested. Our templates below make this easy!
FILE FORMAT & SPECS
- Flattened TIFFs or high quality JPEGs only - NO PDFs, PNG, AI, or EPS.
- 8 or 16 bit only - no HDR/32 bit.
- All layers must be flattened - no embeds, no extra layers, no alpha channels, no smart objects & no fonts!
- Raster/Bitmap files only - No vector files (no AI, EPS, or PDF).
- Adequate resolution at the final intended print size (360ppi - and multiples thereof - is ideal, 300ppi is standard, no less than 180ppi). You can supply at any PPI you prefer, but DO NOT RESAMPLE. See articles here and here.
- Do NOT use the Photoshop ‘export’ dialogue - use ‘Save As’ or Save a Copy’ instead.
Print File Setup Options
We have three file setup options to choose from:
1. Self Setup.
You can setup your images yourself. Make sure you're across all the specifications on this page, as we require files to be supplied already setup and laid out as per these specifications. We have downloadable templates to make this easy. This is our recommendation.
2. Automatic Best Fit.
We can setup files to 'best fit' within the safe printable area free of charge. This means we'll take your whole image and automatically size it to print as large as possible within the safe printable areas on your ordered size/s. This will not stretch/distort or clip your image in any way, and is the quickest option. However being automatic the result may not be precisely what you are expecting - particularly regarding the exact dimensions of ink on the page and the white space around your print.
3. File Setup Service.
If you have specific image size, layout or border width requirements outside of our automatic 'best fit' layout and don't want to do the setup yourself we offer a file setup service for a small fee. You can send us the largest version of the file(s) you have, and very clear instructions, and we can do the file setup for you (+$5 per file/per setup) - added using the 'Add File Setup Fee' button on the order page. One $5 setup fee is required per file/layout. If you have more complex layouts, these will come under our re-touching services as detailed here.
Please indicate in your order or file upload which option you want or are using.
If you do not follow the instructions on this page (or use our file setup service), your order will experience delays.
Paper Sizing and Safe Printable Margins
Sheet Prints
Use our sheet printing service if you would like prints no larger than A2 in size. You can choose to print on A4, A3, A3+ or A2 sheets. Prints over A2 in sizes are done as roll prints.
Please note that we do have maximum safe printable areas for all our sizes. This prevents us from printing borderless/full bleed natively without going up to the next size and trimming back. See our notes on this in our FAQ below.
The Safe Printable Area (centred on the page), for:
- A4 is 267 by 200mm
- A3 is 390 by 287mm
- A3+ is 453 by 319mm
- A2 is 564 by 410mm
Put another way, for sheet prints, the whitespace borders must be no less than 5mm on the long side and 15mm on the short side.
A5s are printed 2-up on an A4 and split in half (must be ordered in pairs - e.g as a whole A4) - see our specific setup guide to A5s and more info below.
Roll Prints
If you want prints larger than standard A2, you will need to use our roll printing service. You can choose prints on either 24 inch (61cm) wide rolls or 44 inch (111.7cm) wide rolls. We charge in 5" increments down the roll.
The Safe Printable Width:
- For 24 inch prints, the recommended safe printing width is 57cm (22.5 Inches).
- For 44 Inch prints, the recommended safe printing width is 107cm (42.1 Inches).
Technically these roll print margins can be exceeded slightly, for example to fit an A1 (59.4cm width) on a 24" roll. We always strongly recommend leaving at least 20mm wherever possible though, as heavy fine art materials can shift slightly as they run through the printer, and this can necessitate some final trimming to remedy.
Templates
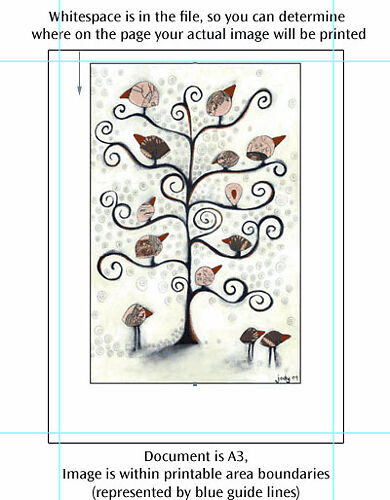
Ideally, please use our templates to ensure you keep within the printable area guides.
DOWNLOAD THEM HERE.
When opened in Adobe Photoshop, Affinity by Canva, or Affinity Photo (Legacy), these have guidelines showing the printable area so you can very precisely place and preview how your images will sit on the page/roll segment.
These will help you make sure your layouts are correct, and your image falls within the printable areas of the page.
The guide lines in these templates are very important - they show the safe printable areas. These are NOT bleed/trim lines. ALL of your image MUST stay within these blue guide lines. Any part of the image outside of these areas will NOT be printed OR may be printed in an unspecified way.
In Photoshop, make sure you have View->Extras ticked, and under the View->Show sub-menu, that 'Guides' is ticked.
FAQs and More Important Info
Unfortunately full bleed/borderless is not something that our printers can physically do.
Essentially to order a full bleed (for example as an A3), you have to in fact order a paper size up (so A3+), and then trim back to A3 size (we can do this for you, although very often the framer can do it too).
Due to the very nature of the pigment ink printing process, full bleed means a print is much much more damageable, as the ink is right up against the edge they effectively cannot be touched or handled without extreme risk of damage or lifting of ink, as such we don't really recommend it unless you really need to.
If you would like us to trim we do require you to add a specific type of crop marks/trim lines to your prints - we do not just accept instructions like 'trim 3cm off the left' or ‘trim to 20x30cm’ as this takes significant extra time and we tend to be very busy here, and it also avoids any chance of misinterpretation of your instructions. If you are unable to add these, we can add them for you for our standard file set-up fee ($5).
We are happy to offer simple trimming free of charge.
Simple trimming is trimming of one image, to size (i.e. up to 4 cuts).
The caveat for this service being free is that customers must supply their file with our recommended trim marks as per our instructions for this, and not just the default Photoshop (or whatever) marks.
Also note that we can't accept instructions like 'trim 3cm off the left' or ‘tri to 20x30cm’ as this requires a lot more time on our part for the measuring etc.
If you are unable to add these, we can add them for you for our standard file set-up fee ($5).
More complex trimming (i.e. multiple images from a roll print, or things precise or exotic) - we do not offer as a service. You will want to get your framer to use their more precise tools for this sort of work.
It's worth noting, though, that our trimmer is not as good or as millimetre accurate as the machines framers use - so we strongly recommend you have your framer trim the prints. We will do our best to do a good job but if things end up a few millimetres off, this is within the tolerances of our equipment, so if real precision on trim is important to you, please have your framer do it.
We do offer A5 printing, but because A4 is the smallest sheet size our printers can physically handle making an order is a slightly different process than normal.
Basically it involves setting up A4 print files with two images per page, we'll then guillotine those down for you free of charge after printing.
Please see our guide to setting up A5 print files before proceeding, particularly regards the specific margins for A5. Also note that on the orders page you need to enter how many A4 sheets you’ll use – i.e. one A4 sheet for each pair of A5 prints. This means that they must be ordered in pairs, and are charged as such.
We don't print on A1 as a sheet, they are printed on a 24” roll as a 24x35”.
For most people’s purposes a 24x35” is a close enough approximation to A1, however, if you need a true A1 print (23.4x33.1”) then this will need to be trimmed down from a 24x35”. See our notes on trimming above.
We print on a self adhesive polyester fabric called Ilfotex, which is perfect for all things signage, wallpapers, decals and wraps. The adhesive is non marking, removable, and very re-usable. Ilfotex has a smooth surface and produces sharp printing results.
Ilfotex prints are only available on a 42 inch roll and are printed/charged in half metre increments up to a maximum length of 3 metres.
The Safe Printable Width:
- For 42 Inch prints, the safe printing width is 100cm (39.4 Inches).
We have a handy guide that shows you how to easily export print ready files from Adobe Lightroom.
See here.
We can use a special mode to print black and white files to give you the best, most neutral possible print outcome for your black and white prints. If you are sending us true black and white files, please make note of this in your order notes or best of all - put something in the file name to indicate true black and white files.
See this article for specifics and pros & cons of the process.
If your files are not explicitly identified as ‘true black and white’ or to ‘use advanced black and white mode’, they will be printed using our standard colour mode.
We are happy to provide ICC profiles for each of our papers that you can use to accurately soft proof your images before printing. We provide these on request, so please Contact Us with what paper/s you are wanting profile/s for.
For each paper we generally supply a separate profile for Colour and Black & White. The colour profile is used by default (we only use the black and white profiles below if you explicitly ask us to do so when you make your order).
Note: These profiles are for soft proofing purposes only - do not convert your images into these profiles when supplying them for printing - leave them in your RGB working space (e.g. sRGB, AdobeRGB etc).
Please note: Print perfection and absolute perfect alignment and squareness is nearly impossible with heavy fine art materials, as they can shift slightly as they run through the printer. Slight skewing of the print on the page/roll may and can occur, and therefore some final trimming of your print may be necessary (it's usually not more than a few millimetres). We strongly recommend you leave more than the minimum amount of required whitespace around the edges to facilitate this (eg. 2cm or more of whitespace).
A note on canvas: as canvas is a woven material that is not fully dimensionally stable it will stretch and shrink as it moves through the printer, while we can compensate for this to a degree, it means the length down the roll can vary slightly from the exact file size, so we recommend leaving extra whitespace in the 'length down the roll' direction to account for this. Once canvas is stretched over stretcher bars this discrepancy reduces also. In addition you should always have stretcher bars cut/made to suit the print once you have it, and not the other way around.
At Image Science all test prints are treated exactly the same as any standard print order. We use the same fine art papers and print on them at the same quality, with the same archival pigment inks. They also require the same handling (all our prints are individually fed into our printers and individually inspected for flaws).
This might sound strange for what is just a ‘test,’ but it’s precisely the point. It’s a 100% proof, or guarantee, of how your image/s will print on your selected paper.
This also means that all testing here is for your purposes only - we needn’t even be informed that what you’re printing is a test (unless you’re after advice, in which case don’t hesitate to get in touch!).
All test prints follow our standard printing rates, file preparation, order & upload process. Note if you’re not confident in Photoshop we provide a basic file setup service for $5 per file.
See our article on test printing here for more information.
Next Steps
1. Send Us Files
Please use our File Uploader to send us your setup files.
Note that Sending us files will not trigger any action at Image Science.
You must make a corresponding Print Order or Contact Us with an enquiry.
2. Place Order Online
Once you have sent us your setup files you will need to place an order with us through our online ordering system.
You can add notes to each individual line item with the file names, instructions or other notes.
When we have received your online order we can then match them up with your files that you have through separately via our online file uploader!