How to Build Your Own Lightbox
Transparencies never look better than they do on a light box. Using a good quality 8x loupe and a daylight balanced light box is still the very best way to proof your transparencies for exposure and sharpness. Projectors heat slides, which firstly affects the dyes in your slides, making them fade much more quickly. Just an hour of projection can visibly affect the colour of them. Secondly, the heat also bends your slides, causing them to 'pop' (the middle of the slide bends). This means you can never have truly sharp focus across the whole frame during projection.
The fluorescent tubes in a light box shine through a diffusion screen to create very even light. The tubes are also daylight balanced - they have a colour temperature of 5000 - 6000 K. This differs from those hand held slide viewers as they are not a tungsten light source, so slides do not take on an unnatural warm cast. The slides colours can be seen accurately and a better judgment can be made of how the slide will look in print.
There are of course lots of light boxes to be bought but they can be a bit on the expensive side. The best models have wonderfully even light, are about 3 inches thick and cost about as much as your first car. Locally made alternatives exist but are still in the region of at least $300 for an A2 sized model (about 70 by 50 cm).
However, light boxes are pretty simple things in the end, so why not build it yourself? You can make it exactly the right size to cover your table or suit your purposes or add some legs and it can even be the table. You can build your own quality light box for half the price or even less, and in just a couple of hours. There is always something nice about building your own tools.
The Project
This article describes how to build a basic A2 sized light box using materials that should be easily available in any large town or city. The whole project should cost approximately $110 and take about one hour to put together. The light box is big enough to view two 35mm slide pages easily and can be used flat or on an angle of about 30 degrees similar to that of a draftsman's table. This means you can rest two A4 'slide pages', or a whole roll of 36, on the light box and still have plenty of room left over for making notes or sorting.
Note: You may need the help of an electrician for five minutes if you are not confident about wiring the fluorescent light battens, or alternatively you can buy light units with inbuilt switches (see below). Do not attempt to do any wiring unless you absolutely know what you are doing - It is illegal in Australia for a non-licensed person to do anything with 240v electricity wiring.
What you will need
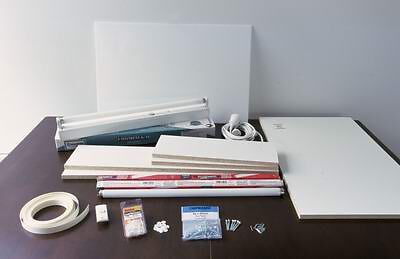
The screen: The light diffusion screen you will need is made from milky white translucent Perspex. It comes in a variety of thicknesses. For a light box this size I recommend a sheet 4.5 mm thick, which should cost you about $20 cut to size, but for extra strength you can get a sheet 6mm thick sheet for about $28. This Perspex lets through 40% of light in either thickness, and any sign store or plastics store in the Yellow Pages will be able to point you in the right direction. It pays to ring around for the best price as some stores may not want to supply non-industrial quantities for a reasonable price. Ask for it to be cut to 710mm by 440mm - they should be able to do this while you wait. If you are making it to different dimensions, please note that you will need to modify the other dimensions listed below accordingly.
The rest: Your local bunnings or hardware mega-store can supply everything else you're going to need. Take the list below with you and away you go.
- 16mm thick Melamine (chip board with a white laminate covering).
This is the perfect material because it is strong, cheap, light and is
already covered with white which will help the light in the box reflect
evenly through the diffusing Perspex. Ask the kind people of Bunnings to
cut it into 6 pieces with the dimensions given below (costs about $4
for the cutting).
- 3 long side pieces each 150mm high by 750mm long (one of these will become the prop, see below)
- 2 short side pieces each 150mm high by 440mm long
- A base piece 718mm long by 440mm wide
- Two fluorescent battens. These are complete fluorescent light units. They have the starter, the tubes and the housing all in one easy to use unit. They are easier and cheaper than buying all the separate pieces and putting it all together yourself. Bunnings stock Crompton Lighting 'Easy Fit Crompack 2 Bare Battens', at $21.44 each. They take 18 watt tubes, 60cm in length. If you don't want to do any wiring yourself and can't find a friendly electrician, just buy battens with cords and switches. You can plug them both into a double adaptor and just turn your light box on and off at the switch.
- Two daylight balanced tubes. The tubes that come with battens will be standard fluorescent tubes. Take them out and use them in your desk lamp. They're not bright enough and have a green quality to their light so are not good for looking at slides. Replace them with 5000K balanced tubes. These are bright and balanced approximately to 'daylight', so they do not have the colour cast of normal tubes. Bunnings stock NEC Triphosphor HG tubes - 18 watts, 60cm long, 5000K Neutral White. You can also get these from lighting retailers. Any tubes balanced from 5000K to 6500K will be fine with the light being slightly warmer at the 5000K end, slightly cooler at the 6500K end. They should cost less than $10 each.
- Beading - just a simple strip of wood about 8mm thick, 10 to 30 mm wide, and 2.5 metres long. You don't need to be precise with this, it just becomes the rebate frame on which the perspex rests.
- Screws - a packet of chipboard screws (8g by 40mm, countersunk)
- Nails - 8mm nails to hammer the beading to the chipboard.
- Power cord - Just buy an extension cord of any length you like and cut the female end off (ie not the plug!)
Tools:
- Drill
- Screwdriver
Putting it all together
Step One - Cut wood to size
If you have already had your wood cut to size by your hardware store skip to step two. Otherwise, cut the Melamime to the sizes given above. Be precise, everything should fit snugly.
Step Two - Assemble the four sides
Drill pilot holes and counter sink holes for two screws for each of the sides. Drill through the front and back pieces into the edges of the short side pieces as the base is sized this way. Make sure you assemble the sides squarely or the base won't fit.
Step Three - Make the rebate for the Perspex

Cut the beading into sections, two of them 400mm long, and another two 700mm long. Mark a line 10mm from the top of the side pieces. Nail the beading to the inside of the sides - stand the box on edge to do this. Make sure you hammer the nails into the centre of the beading or you may split the wood. When the Perspex sits on this rebate it will be recessed about 5mm below the edges of the light box. You will be able to rest your slide pages on this lip when the light box is raised up on the prop.
Step Four - Attach the base
Drill pilot holes and counter sink holes for three screws along the front and back and two each for the sides. Attach the base. It should fit snugly. If you have trouble getting it in, slip it in on an angle and tap it gently into place with a hammer.
Step Five - Drill a cord hole, Wire the lights
Using a 10mm drill bit, drill a hole for the power cord, out of the back piece near the bottom on the right. If you are using battens with switches, put the double adaptor inside the box so you have just one cord coming out. If you are using the basic battens, drill or chisel a hole to mount the switch. It doesn't have to be too neat as the edges of the switch will cover the hole.
Now, wire the lights. Get an electrician to wire up the lights if you're not completely confident of what you're doing.
The lights can be placed in the box and mounted with glue, tape, even Blutack. I find back to back works quite well to create even light, but you can try out different options.
Step Six (Optional) - The prop

Attach the prop to the bottom of the back piece using the hinges (be careful you place them so that they swing the right way!). The prop swings around and sits neatly under the back piece to prop up the light box to around 30 degrees. You could then attach the chain and hooks to the prop and the sides so that when the prop is in place, the chain prevents the prop from slipping out from under the light box.
Step Seven (Optional) - Making it pretty
You can cover the screw holes with little white covers (from Bunnings) and the edges with white paint to neaten things up a bit. You can even paint the outside pretty colours if you wish, but leave the inside white to help reflect the light evenly.
Now it's all finished - Plug it in, turn it on, and enjoy!