Hahnemühle Photo Rag Satin 310gsm
Unique paper with a satin appearance only on the printed areas! Accepts matte black inks.
Please note that we are open by appointment only (except for click and collect pickups once notified ready).
This article describes the use of Cross Rendered Proofing techniques in the domain of simulating traditional alternative photographic printmaking techniques, such as Albumen prints. We provide profiles for you to try this for yourself for Albumen, Van Dyke Brown and Cyanotype prints. The same technique could be extended to any number of alternative process, such as Photogravure, or Bleach Bypass.
Recently I helped with an interesting project, on behalf of RMIT student Boheme Jennifer Rawoteea for her final year research project. The project's goal was to use modern digital techniques to simulate a traditional, alternative photographic process.
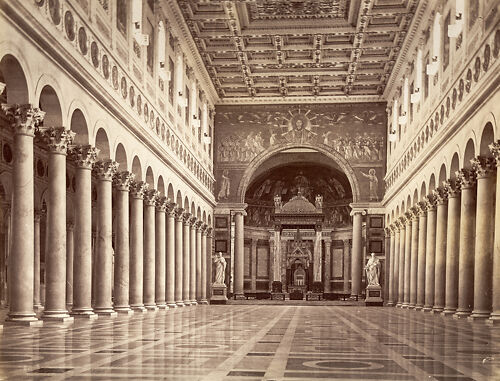
Boheme chose to attempt to emulate Albumen prints. These prints have a unique character of warm eggshell tones, and compressed tonal range - with dense shadows and creamy highlights. You can read about, and see examples of Albumen prints on Wikipedia or on the Albumen Conservation Website. Albumen prints are today still made in the way as detailed on wikipedia - cotton rag papers are used, and the result is a rich print with a slight texture and slight glossy appearance from the egg wash.
Boheme brought some sample prints to our office and immediately I noticed that the substrate/slight gloss effect of the prints was very similar visually to prints made on Hahnemuhle Photo Rag Satin paper.
We decided to use Cross Rendered Proofing as the process for simulating the original albumen prints with prints on Photo Rag Satin. While there are other techniques for simulating film based processes, these techniques all involve judging the process by eye and extensive work in Photoshop to achieve the required look. In my experience, this is generally a significant amount of work, and often the results are good but just not quite perfect.
There are many reasons to simulate traditional processes, rather than actually print with the traditional process itself.
Firstly, not everyone has access to the materials required for many of the processes, and many alternative processes use chemicals that can be quite unpleasant to work with and at times unsafe. Of course it's often quite possible to work safely with most of the chemicals involved in most alternative processes, however this can be a concern for many people.
Further, it can take significant time to develop the skills required to make high quality prints with alternative processes - there are 6 month fill time courses on alternative processes on offer, it is not exactly something you can master in a few hours. Good digital technique takes just as long to develop as good analogue technique, but I would presume that most of the people reading this article are already quite good with digital imaging and comfortable with the use of ICC profiles.
Use of these techniques allows you to:
By using Cross Rendered Proofing, we can take direct measurements of the important characteristics of the original prints directly, resulting in a very quick, very effective simulation of a particular print process.
As you can see from the article on Cross Rendered Proofing, three things are required:
Numbers 1 and 3 are easy - at Image Science we already have excellent screens, properly calibrated, and already have created excellent custom profiles for Photo Rag Satin printed on our Epson 7900.
Step 2 is the key to the process - we must create an accurate description of the Albumen print in the form of an ICC profile. This profile must reflect the tonal qualities of the print as accurately as possible, essentially the colours and densities of the tones from d-max to d-min - maximum black to paper white.
Creating an ICC profile for Albumen prints was in fact relatively simple. We adapted our regular profile making techniques for black and white prints, as Albumen prints, while toned, are a mono-chromatic print process.
However, we needed the profile target to be printed as an Albumen print. This involved the creation of a digital negative for contact printing. Essentially, our black and white target was inverted and printed on clear film. Attention was paid to getting the tonal separation correct on this target print.
The basic process is to use an inkjet printer to print to clear film. Ideally an ICC profile of the clear film is used so that the resulting negative print has good, linear tonal separation. It is important to remember to invert the profile target image when making this print as the final print will invert the image again back to its original form, which is what the profiling machine is expecting.
Next we read the Albumen print using our spectrophotometer and created an RGB profile of the Albumen print process. This profile is available to download in zipped form here for your own use.
The spectrophotometer recorded that the albumen print process shows some solarisation in the shadow tones - the data was massaged slightly to remove this solarisation while maintaining the general tonal response curve of the process. The result is a very accurate ICC profile that describes the Albumen process.
A black and white image is opened in Photoshop and we proof with the ICC profile for Albumen prints:
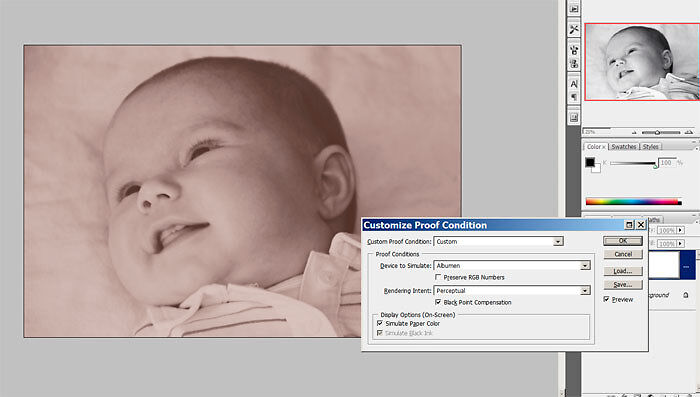
Here you can see we are doing an advanced soft proof of an albumen print. In the right hand corner you can see the original black and white file.
At this stage, with the soft proof on, we can edit our image to take best advantage of the available tonal range of the Albumen process. For example I slightly increased the contrast of the image above to to take better advantage of the limited tonal range of the Albumen process.
To make the print, we set up a Cross Rendered Proof:
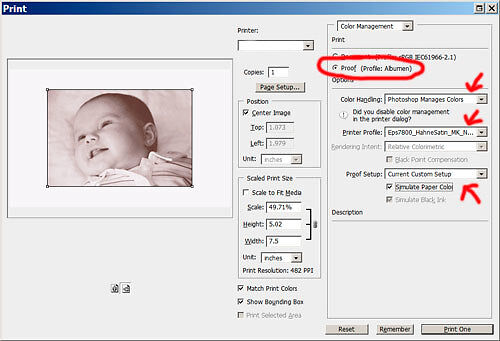
You can see that we've used 'Proof' as the print rather than 'Document'. We've let Photoshop determine the colours and chosen our profile for the paper stock we're using as Photo Rag Satin. We've made sure to tick 'Simulate Paper Colour' and 'Simulate Ink Black'.
If we now hit print, we should get a very accurate simulation of an albumen print.
The digital prints are an excellent match to the original albumen prints. The tonal range is spot on, which is not surprising as it's been accurately measured with a spectrophotometer, and the tonal character is uncannily accurate as well. To be honest I was surprised at just how successful the process was. The accuracy far exceeds any ad hoc techniques I've seen applied in Photoshop for simulating alternative processes.
It helps a lot that Photo Rag Satin has a very similar visual character to the prints made using the albumen process. Photo Rag Satin is an unusual paper with limited uses in my experience, but was perfect for this project. Hahnemuhle produce a number of papers with the Satin coating, so other options are available.
It's worth noting that this process only helps you simulate the tonality of the process you are simulating. Paper characteristics are hopefully achieved by choosing a very similar output stock to that which is traditionally used with the process. If there are other physical characteristics, such as grain structure, embossing stamps, or irregularities from hand coating, then you will still have to re-create this in Photoshop with other techniques - such as texture overlays.
Australia, and particularly Victoria, is blessed with several excellent teaching institutions where you can learn about traditional printmaking processes.
Of course there are some excellent online resources as well - as ever Google is your friend!